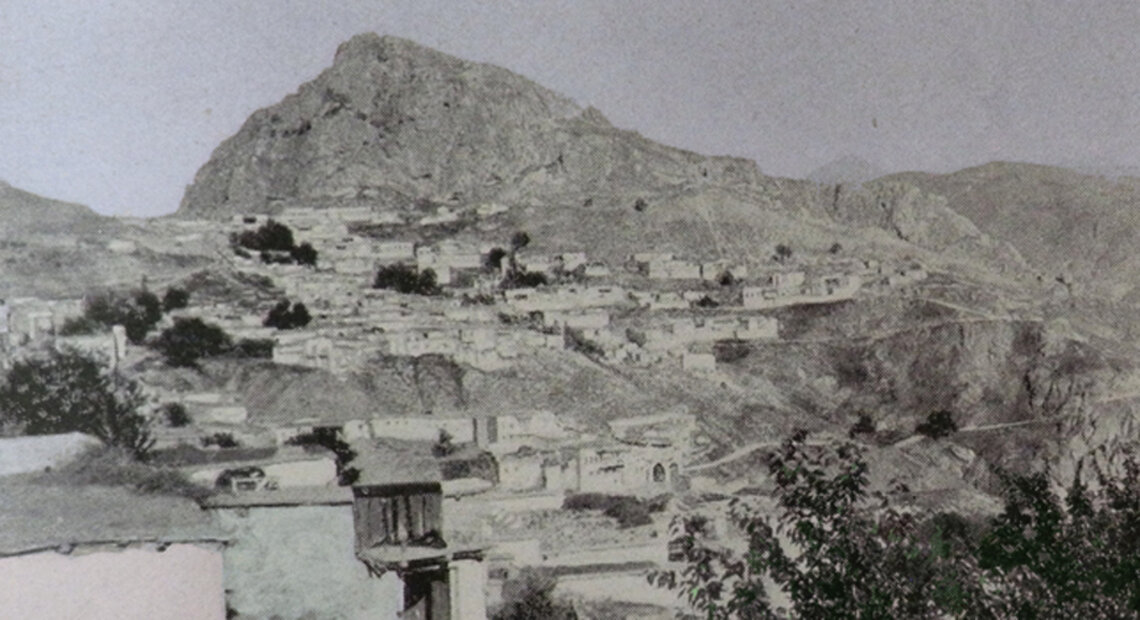
Palu - Agriculture (Cotton)
")
These pages under the 'Agriculture' sub-heading are concerned with the cultivation of cotton and the ancient trade of weaving cloth from it in Palu. You will find two successive articles here.
Cotton: from cultivation to thread
This part is taken from Rev Harutiun Sarkisian’s (nom-de-plume Alevor) book.[1] We have only minimally intervened in the original text. Every explanation and all additions made to the text are written in italics.
The cultivation of cotton
The village farmer earmarks several of his fields for the cultivation of cotton and ploughs them five or six times. After each ploughing he waits for ten days. After April 7th of the next year, the appropriate amount of cotton seeds to be planted are spread on the floor of the house and mixed with a solution of dung (kagor) and water, allowing the seeds to absorb it until all the seeds swell a little. After keeping the seeds in that state for a day or two, they are bagged and loaded (tampel) onto donkeys and taken to the fields for sowing. These fields will have been irrigated a week before. The expert sower holds two ends of a square white sheet in his hand, making it like a bag and, filling it with seed, stands on the first division of the field (a field is divided into strips about 4 metres wide, divided by temporary walkways) and begins sowing with his right hand. He uses his hand as a measure. When he completes sowing that strip, he repeats the process until he has sown the entire field.
The sower is followed by one or more ploughs that plough up the sown parts of the field. Another follows and harrows (tsakhel) the ground with a pair of oxen or buffaloes. They repeat the process of harrowing several times, so that the field is well flattened, and doesn’t have any humps that might prevent the upright growth of the cotton [page 43]. This completes the sowing.
The cotton gradually begins to grow […] The farmer has already looked at the field of cotton and noted the sprouting of plants harmful to the crop at the same time. Considering it time to remove them, he tells his people that they must go to the field and ‘weed’ it.
[…] This is done using mattocks, the blades of which have been previously prepared by the blacksmith. When the handles have been fitted, all the girls and young married women are called in so that each may chose her tool, and a mark is put on the handle to distinguish it from all the others and to prevent arguments that ‘this is mine, that is yours’.
At the command of the elder of the household, early in the morning, before dawn, everyone is up and about, especially the girls and young women who are ‘going weeding’ (kakhank) [page 44]. […] Immediately on reaching the field to be weeded, the oldest and most experienced of the group, having put the group’s daily meal in one corner, says an ‘Our Father’ before starting work. She arranges her fellow-workers in a line on the first walkway, with them all singing a ‘sharki’ or dance song as they work. All of them work bent over in the field. They continue working until they have completed weeding all of it. They repeat the weeding five or six times, until they are certain that the cotton plants are strong enough and will hold their own against them. Weeding takes place five or six times with a ten day break between each ‘weeding’. They also irrigate the fields the same number of times. When the field begins to dry out, the weeding begins, as I said, until it is no longer necessary.
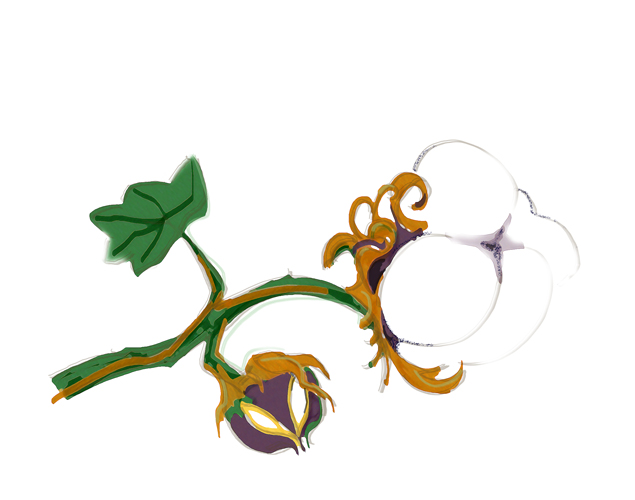
The cotton bushes grow with straight stems without branches in July. The village farmer has found the way for those plants to have branches. Once each week during that month the womenfolk go to the cotton field, cut the tops off all the stems of every plant. This is called ‘cotton pruning’. This is repeated several times. As a result the cotton plants grow more luxuriant and the crop greater. If the plants aren’t trimmed, the crop will be smaller. From then until the end of August the farmer leaves the crop alone. At the same time the cotton bushes produce yellow flowers which turn into green, round cotton bolls (enguiz) which open under the hot sunshine, decorating the field with white balls to the great pleasure of the village farmer [page 45].
[The ten percent cotton tithe is assessed halfway through October or at the beginning of November and is carried out in a particular way. It is only after it has been completed that the villager has the right to begin the cotton harvest. On this occasion most of the villagers gather and the news of the harvesting of the cotton reaches the nearby Kurdish villages. This is how Rev Haroutiun Sarkisian describes this overall picture].
[…] The carts pulled by donkeys and oxen are there, to transport the harvested cotton home, filled completely with sacks and baskets (sabad) of cotton. The Kurds – both local and from a distance – are there, bartering pomegranates, apples, walnuts, pears, raisins and apricot leather (bastegh) for cotton; also present are those who beg for cotton.
[…] The cotton harvest lasts about two to three weeks. There are some cotton fields containing bushes that, being stronger, are kept growing and their bolls open late. Until that time, the sun loses its strength and a quarter of the bolls remain closed. They stay on their bushes [page 46]. Because of this, it is necessary to wait for a further week or two, until they open too. If that time isn’t sufficient for them to open, then they harvest the bolls in their unopened state and, before the cold weather sets in, take them home, keeping them separate from the opened ones. Some of the unopened ones are taken up on to the roof and spread out against the walls in the sun. Apart from this, they also put a quantity on top of the hot oven (tonir) when they bake bread and, thanks to the heat it gives off, the bolls open, freeing the cotton. But these late artificially ripened bolls are worth a great deal less, as they are not as white nor are the threads as long as those harvested having ripened naturally.
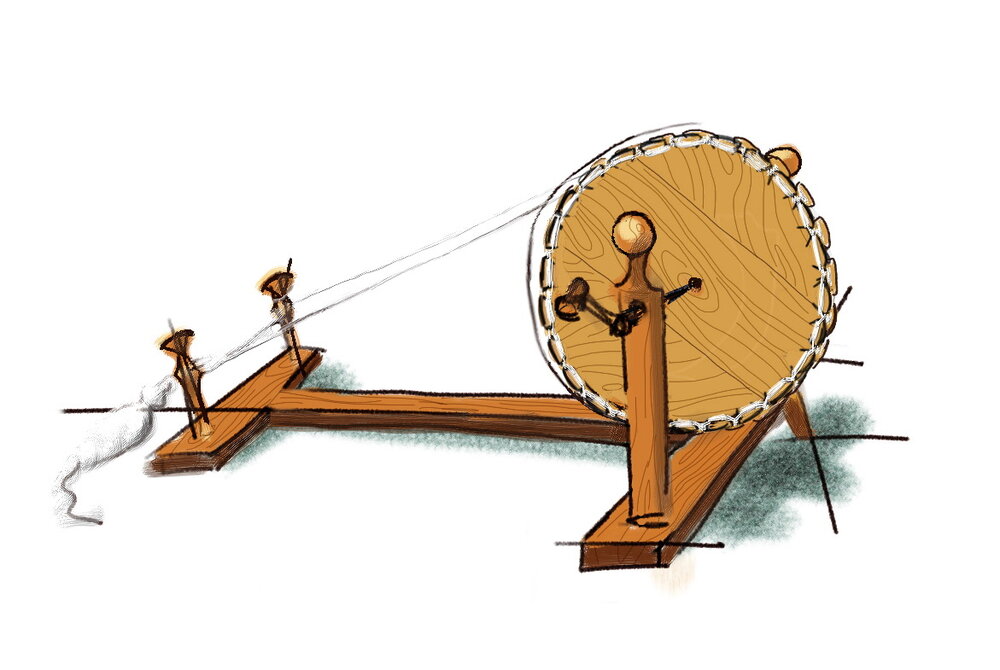
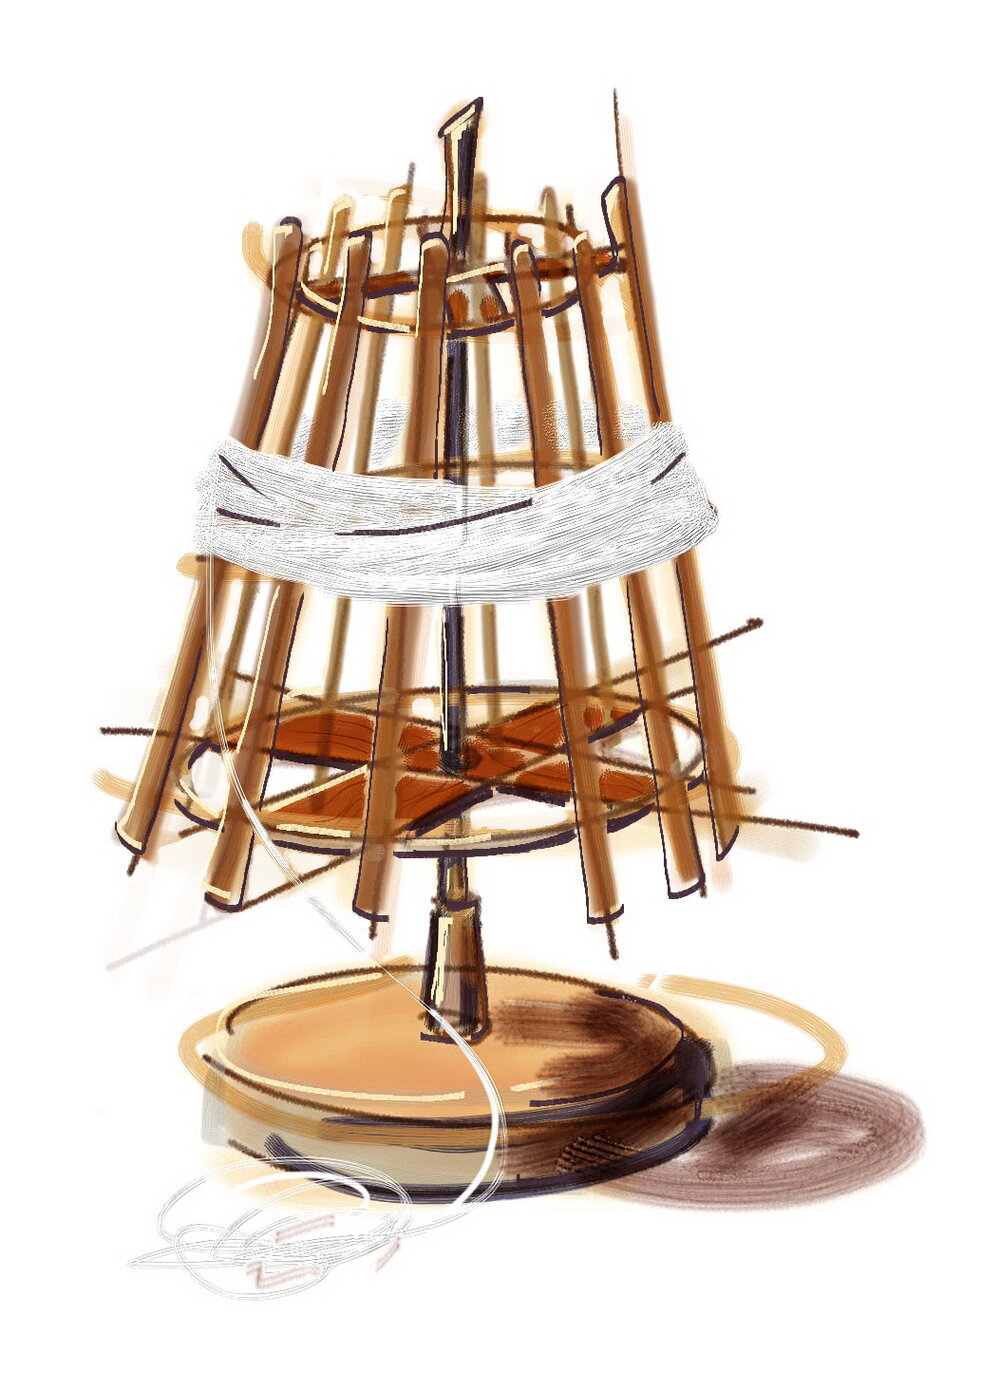
The chalkhavou or cotton cleaning tool
The first balls of cotton harvested and taken home are dry, so don’t need drying in the sun. They only need to be cleaned. To do this, a tool made of thin but flexible twigs like willow has been thought out, a little more than 1 metre in length, looking like a loosely-woven basket but cigar-shaped, like a churn (khnotsi). The tapered ends each have a central hole through which an axle is fitted which has to be at least as thick as an arm to withstand the pressure put on it. The whole is set up on two closely spaced stout pillars. The name of this whole assembly is chalkhavou. The cotton balls to be cleaned are put inside the basket-like assembly and rotated by hand at a regular, but not fast speed. The weight to be cleaned each time is almost 15 kashes [19.2kg, 42 lb]. The chalkhavou is turned continuously for over half an hour, so that the small remnants of dry leaves, dry soil and dust and other things sticking to or wound round the ball fall through the holes in the chalkhavou’s basket. This is the way they clean all the balls [page 47].
It is after this that the work of clearing each cleaned ball of its dry, sharp husk is carried out. Those houses that have a lot of cotton to process invite their friends and neighbours in the evenings to help in the work. Unlike in Adana or other places this is not done for money; the peasant is not used to assist his neighbours for money.

The cotton gin: the tool to separate the seeds from the cotton
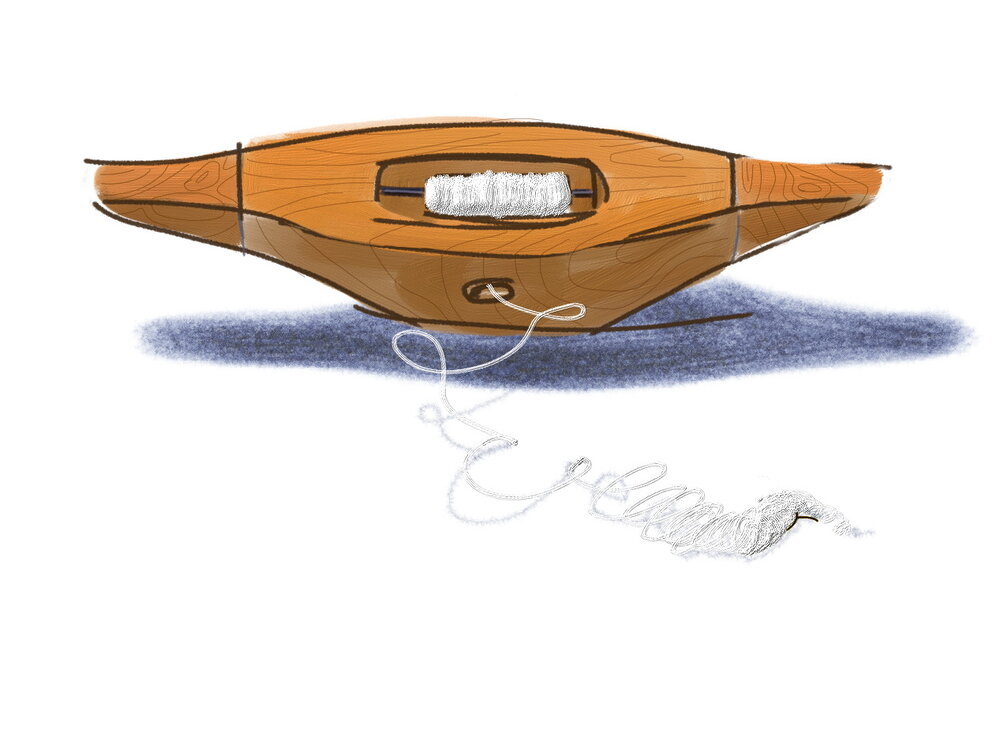
[…] The cotton has been separated from its husks and stored in a corner of the house. It has to have its seeds removed. The villager hasn’t got tools built according to modern scientific systems to separate the seeds from the balls, as peasants have in Europe and America [page 48]. The Armenian peasant’s tool is a very simple gin, a traditional design passed down through the centuries called the djerdjer. […] The cotton gin comprises of five parts, made from either walnut or oak, which are a base, two uprights, a roller, an arm and a spindle. Apart from these stiffeners are used to strengthen the gin. The base is 50cm long by 30cm wide by 10cm thick and the two uprights 40cm long by 10cm wide by 5cm thick. The carpenter bores two holes in the base to take the uprights. These are set 5-6cm from each end of the base and are large enough to take the two upright posts, which are secured firmly in them after four horizontal stiffening timbers and the remaining parts are added. Holes are bored in the uprights to take the three lower stiffeners, which are made of smoothed wood, each exactly the same. These are fitted with a space between each, the topmost one being used as a firm rest for the roller, its top edge being 10cm from the top of the upright. The roller is made of specially selected oak, fitted on to a spindle, and looking like a rolling pin (okhlavou). It is 35cm long and has a diameter of 7cm,[2] its ends being reduced to 5cm, especially that on the right-hand end, which is extended through the upright and carries the turning handle. It has one peculiarity: it is soft and has, in its surface, many tiny chips very close together. The more it is used, the more the chips come off. A steel or clean iron spindle about 50cm long and about a finger’s thickness is inserted into holes in the uprights above the roller. Both ends of the spindle are thinner than the central part and extend beyond the uprights. The left-hand end is flat and has a hole in it to take the wooden wheel to link it via a drive to the spinning wheel. The other end extends beyond the right upright or is flush with it. This, then, is the village cotton gin used to extract the seeds from the cotton itself. Every operator can pick up his cotton gin and take it to distant places. Those who have a lot of cotton in their houses use 4 or 5 gins, their operators sitting in a line [page 49] before them, feeding the cotton between the roller and the spindle with their left hands, while turning the handles with their right. The de-seeded cotton piles up behind this small tool and the seeds fall into the operator’s lap.
It mustn’t be forgotten that the roller and spindle are lubricated with soap that hasn’t been dipped in water so that both can turn easily without tiring the operator. The cotton is beaten with a special tool before being put through the cotton gin [page 50]
Carding the cotton

[After ginning, the cotton is carded or made into threads. That is, once more, done in each house by the women. The bow (aghegh) is used for this work that, according the Rev Haroutiun Sarkisian’s description, is a relatively simple tool, and its use is known, in dialect, as ‘aghnel’]: A thin string made of sheep gut is secured to each end of the bow. The person who is doing the job holds the bow in their right hand with the string uppermost and strikes the string with a 15cm bell-shaped wooden striker known as a chak or aghenpad.
One or more women, skilled and strong, sit in line next to one another, each with her bow, and begin to card the cotton. The carded cotton must be very fine, such that not even one minor scrap of uncarded cotton, that has escaped the carder’s attention, appears in the finished work [page 51].[…] In front of each carder sits a young woman or girl with her own, round, smooth table in front of her, on to which a portion of the carded cotton is put and, winding the thread onto a thin spindle (ilig) about 25-35cm long, she turns the cotton into wick-like twisted lengths. These they pile onto sieves. Others take those wicks and, twisting between 8 and 10 of them together, make them into threads. These are called coula. This is followed by the use of the spinning wheel [page 52].
- [1] Rev Harutiun Sarkisian (Alevor), Palu: customs, educational and intellectual state and dialect (in Armenian), Sahag-Mesrob Press, Cairo 1932.
- [2] The original text gives 3cm, but this is not logical as the roller (logh)’s ends ‘are reduced to 5cm diameter’, the iron spindle is ‘the thickness of a finger’ (ie about 2cm) and the space for them is 10cm. (Translator's note)
* * * * * * * * * * * * * * * * * * * *
Linen and cotton cloth weaving
A note by ‘Houshamadyan’
This section concerning the preparation of linen cloth in Palu is taken in its entirety from Rev Harutiun Sarkisian’s book. There is no doubt that the author knew the trade very well and his description is fundamentally based on his personal experience. It is obvious that this way of weaving linen and cotton cloth forms part of the Palu Armenians’ legacy from long ago. Rev Harutiun’s text is unique because he reconstructs, in all its detail, such a legacy, a trade that we think cannot be carried on the world today with such localised methods. This is why we are convinced it would be unjust if we were to try to synthesise, to précis, or in other words to basically change this article. It is true that to a certain extent it is difficult and may occasionally seem boring for the layman, while for the expert certain parts of the description may be almost unintelligible. We have the impression that Rev Harutiun has written it very quickly, has not reviewed the text, and has prepared it as a narrative that doesn’t match his literary style. To all this must be added the fact that there are many specialist words used in these pages that are specific to cotton preparation and weaving and to agriculture in general that have gone out of daily use. Rev Harutiun also writes in a mixture of dialect and ordinary Armenian, often without noting the meanings of the words he’s used. [1] In addition the punctuation used is confused, which makes the smooth reading of the text even more difficult.
Despite all this, we think that a text like this completely fulfils ‘Houshamadyan’s’ aims, one of the basic one being the reconstruction of the daily life of Armenians in the Ottoman Empire. In fact the weaving of linen and cotton cloth was an important part of Palu district life. We are going to try to reproduce it as Rev Harutiun Sarkisian offered it to the readers of his book. In several places we have been forced to intervene editorially. These are mainly to do with punctuation and spelling. To make reading easier we have added sub-headings to Rev Harutiun’s text. We have also added a glossary, containing various words connected with the manufacture of linen and cotton and their meanings. Finally, alongside the text are the descriptions of various toolswhich have also been prepared by the author.
The spinning wheel or the tool to make cotton into yarn [2]
The Armenian peasant doesn’t have special tools to to make cotton into yarn. His is the simple, formless spinning wheel, left to him as a sacred legacy by his forefathers, and which is not a complicated machine. This rough and poorly-formed, ancient, small spinning tool consists of several simple wooden parts, the base of which forms an ‘H’ shape. The first part is the right-hand end, 1.3 metres long [4ft 3 inches], 5 cm [2 inches] high and 15 cm [6 inches] wide. A hole about 5 cm [2 inches] in diameter is bored about 5 or 6 cm [2 or 2.5 inches] from each end. A pillar about 50cm [1 foot 8 inches] high and 10 cm [4 inches] thick is secured in each hole. A hole is bored in each pillar about 8-10 cm [3.2-4 inches] from the top, exactly opposite each other, through which an axle about 2 cm [0.8 inch] diameter is passed. This is fitted with a large circular wheel, then a 10 cm [4 inch] thick washer of about the same diameter followed by a second large wheel, all set between the pillars. This assembly forms the drive for the spinning wheel. The two wheels have drive cords fitted round them stretching to the shaft (bukra) at the left hand end of the assembly. Then a handle to turn the assembly is fitted on the outer end on the front of the spinning wheel.
At the other (left-hand) end, this part of the ‘H’ shaped base has two upright posts holding the shaft called a bukra. This is about 10cm [4inch] long, made of bone, and set parallel to the axle carrying the drive wheels. It takes the drive cords from the large wheels. The spindle, on which the thread is created and wound, is set into its end at the front. [page 52]
[…] The yarn that is to be spun has to be one of three different kinds: fine, medium and thick. Three to four skeins of fine yarn can be spun in one day by an expert village woman. Between four and almost six skeins of the medium can be spun in a day, and from six to seven or eight of the thick in the same timescale, if the woman works continuously at the spinning wheel. The fine kind is used for dyeing into many colours, after which it is woven into cloth suitable for women’s clothes. That kind of cloth is called khad. The medium yarn is for men, and the thick for beds and aprons. [page 53]
The loom or pit loom
")
[There are many houses in the villages around Palu containing looms that are small weaving factories. They are known as hor (pit) in local dialect, and the weaver is known as a ‘pit worker’].
When the loom builder is to prepare a pit loom, he has all his tools in front of him. Then he has a pit dug about 60 cm [2 feet] long by 30 cm [1 foot] wide and 40-45 cm [1 foot 8 inches] deep near the wall against which the weaver is to lean. The first part, in other words the start, where the weaver sits, has two sides, one on either side of him and about 1 metre [3 feet 3 inches] apart. At each of those sides, a thick, smoothed piece of timber, about 40 cm [1 foot 4 inches] long is hammered into the ground. A large round hole is bored in each about 4-5 cm [1.6-2 inches] down from the top to support the cloth beam. This beam is a square section piece of apricot wood about 1 metre [3 feet 3 inches] long, and has smooth cylindrical ends of about 40 cm [16 inches] circumference about 15 cm [6 inches] long.
The right-hand square end of the cloth beam has each face drilled [page 54] with a hole to take a 50 cm [1 foot 8 inches] long and 20 cm [8 inches] diameter lever. This is used to gradually turn the completed cloth onto the cloth beam.
After fitting the cloth beam into its supports, the loom-maker hammers two 30 cm [12 inches] long posts 25 cm [10 inches] into the ground in the pit, such that the weaver’s heels will touch them. To the heads of each of these a light chain or canvas rope is fixed, each of the free ends being secured to a strong piece of wood (the treadle) for the weaver’s feet.
These treadles reach from their securing points to the other end of the pit. A hole is bored in each [at the far end] of them to take a chain, so that they may be individually linked to a thick, smooth, long-lasting timber the width of the pit through holes bored in them.
Then a post, made of wood and 50 cm [1 foot 8 inches] long and 10 cm [4 inches] thick, is hammered into the ground to a depth of 25 cm [10 inches] on each side of the the far end of the loom, at each edge. The distance between them is about 60 cm [2 feet] or the width of the loom at that point.
The heads of these two posts are each equally divided into two parts to a depth of 5 cm [2 inches] from the top, so that a smooth flat piece of timber the width of the loom and 6 cm [2.4 inches] by 8 cm [3.2 inches] known as a lintel (palaver) may be fitted in them. This lintel is set 10 cm (4 inches) higher than the cloth beam. The space between the cloth beam and the lintel is used for the heddle rods holding the heddles so that the weaver, if necessary, can reach the threads from where he is seated, to straighten them or knot the ends of a thread that has broken.
A post 20 cm [8 inches] long is hammered into the ground 5 cm [2 inches] behind the lintel and 5 cm [2 inches] outside it to a depth of 15 cm [6 inches], opposite each other, one on each side of the loom.
A stave approximately 1 metre [39 inches] long and 30 cm [1 foot] in circumference is passed through a hole bored in each post. A small, smooth, wooden 8 cm [3.2 inches] long pillar is secured in each end of this stave, so that they can each take a 50 cm [1 foot 4 inches] long wooden arm. The ends of each of these two arms, which have to be attached to the beater, has three or four small holes bored into them in a line next to each other to take the end spindle. [page 55] The 1 metre long (39 inches) rod that carried the arms is called a pergel. The rod, arms and beater are linked together with spindles and nails. It is with the assembly of these three parts that the weaver is able to weave cloth.
Then four pairs of stout woven cloth ropes are hung from the ceiling directly above the centre of the loom, the first two pairs for the beater, and the other two for the heddle bars located behind it. One pair of the beater’s ropes is secured to the ring fitted at one of its outer top coners, the other to the other ring placed at the other end.
Two pairs of ropes are used for the heddle harnesses, one for each. The run over pulley wheels located on a rod about 4 cm [1.6 inches] long and 1 cm [0.4 inch] circumference fixed to the ceiling, allowing the harnesses to rise and fall. The remaining two pairs of ropes are for the beater, and its pulley wheels are set in the ceiling 40 [16 inches] cm from the first two.
The length of the ropes are carefully calculated, so that they have a correct relationship to the parts they are connected to; in other words the cloth beam, beater and heddle should not be forward or back from each other.
Then two posts for the lower cylindrical roller are hammered into the ground and are located about 2.5 metres [7 feet 2 inches] from the front of the loom. The roller itself is a smooth wooden cylinder about 60 cm [2 feet] long and 10 cm [4 inches] in circumference, the ends of which have been reduced to fit the holes in the posts. These posts are the same distance apart as the lintel, as the entire tension of the cloth being woven is taken up by this, the cloth beam and the cylindrical upper roller.
The best kind of beater is made of apricot wood [and is a rectangular framework]. The top horizontal part is made from a thin piece of the same timber, and its top edge is almost pointed in the centre. It is approximately 1.1 m [3 feet 7 inches] long and each end slopes slightly upwards, with spindles nailed to it, to mate with the appropriate holes in the arms attached to the roller called the pergel. The lower horizontal part of the beater is made of the same wood and is the same length. The comb is fitted between these two horizontal parts, from the centre to the ends, in a long, straight slot that is as narrow as a saw blade. This whole assembly is held together by a thin string made of leather, so that the weaving comb fitted between them is immovable when the loom is used.
Completion of building and fine tuning the loom
The size of the beater is taken from that of the cloth beam. The left and right sides are measured using a thin wire. If the right [page 56] sides are not equal to those of the left, in other words if the right hand side of the beater is close to the cloth beam, then the ropes supporting that side from the ceiling are moved forward or back until they are equal. Then the opposite corners are measured by taking the right hand side wire and stretching the other end to the spindle secured in the left hand arm. The process is repeated for the other side. If there is a difference then the end furthest away from the cloth beam is moved towards it from the ceiling. The central summit of the beater is also measured from the ends of the cloth beam; it is centred by moving the ropes supporting it from the ceiling forward or back.
During the time when the loom is in use, a post 20 cm [8 inches] in circumference and 30 cm [1 foot] long is hammered into the ground near the weaver’s right hand and a woven cloth rope 7 metres [22 feet 9 inches] long is secured to it. This loom rope is very long and rises, from the place in the pit the weaver sits, to the upper roller above his head. Then it passes over it and between the rope assemblies that support the beater and the heddles, round the lower roller, and from there to the cloth beam. A further post is added; it is of the same thickness and length, but has two branches. It is hammered into the ground just behind the place the weaver sits, such that one branch is hammered into the floor, the other being secured in the wall. The upper end of this divided post remains 4-5 cm [1.6-2 inches] above the floor. As a result of its placement, a hole is created between it and the floor, through which the rope passes to join it to the small wooden toggle (godjag), around which the threads for the warp are gathered and to which the the loom rope is tied. This post is also measured from the ends of the upper roller and the cloth beam to site it centrally. [page 57] The skein to be used for weaving having been wound, it is knotted by the weaver and hung on a post secured on the wall to his left and quite high up. When he begins weaving, the weaver secures the loom rope that, as mentioned, passes through the divided post in the floor, to the small wooden toggle which is about the length and diameter of a finger, and, with it, to the skein of yarn, passing it through the loop at the end of the rope.
The upper roller, like the lower one, is a smooth, cylindrical piece of wood of the same length. It is fixed to the ceiling just above the weaver’s head. Its position is determined by checking it against cloth beam. Both parts’ corners measured from the left of one and the right of the other and vice versa, must be exactly equal to each other without any difference. If there is a difference then either the emd furthest away from the cloth beam is moved forward, or if one end is too close, then it is moved further away. The height between them is also checked with wires; the builder sits at the loom with his back against the wall holding the end of each wire, another person holding the other ends against the ends of the upper roller. The builder then checks the distance between each end of the roller and the end of the cloth beam, thus measuring the height. If the wire doesn’t reach the cloth beam, then that corner of the roller assembly is lowered until it does and both ends are equal.
To check the loom completely accurately the best measuring device is the wire, which is as thin as the string of a violin. All of the loom’s posts and the ropes hanging from the ceiling are checked and corrected from the cloth beam. As soon as the position of the upper roller has been verified, the position of the lower roller is also checked in relation to the cloth beam. If one end is too far away, its post is moved towards the beam. This is done by the builder sitting at the loom, holding the ends of the wires at the corners of the cloth beam. The other ends of the wires are held by someone else at the opposing corners of the lower roller. If the wires touch where they cross, then the roller is set correctly. If not, then the higher end of the roller is lowered until the wires do touch. This is how their heights are adjusted. [page 58] The most important parts are the cloth beam, the upper roller and the lower one that, when checked and secured accurately, allow the other parts to be checked easily. The ropes for the beater and heddles must be hung from the ceiling exactly over the middle of the length of the loom. They therefore must be equal to the corners of the cloth beam and not be forward or back from each other.
A crooked loom will, naturally, give a crooked result. A weaver who doesn’t know how to correct his loom will be in great trouble, as he won’t be able to produce a a straight piece of cloth. In this case one side of the cloth will be forward and the other behind. At the same time the cloth beam will begin to hit the edge of the cloth crookedly and in many cases break the comb as well as the poor weaver’s wishes, energy and his pride in his skill, as he will have remained ignorant in his trade.
The village weaving factory is like this. The weaver, when he is weaving, holds the beater and strikes it against the cloth; from either near or from a distance it makes a clicking sound. Although this method of weaving is very noisy, at the same time it should be said that this method produces cloth that is much more durable than that produced on other types of loom. When the weaver strikes the woven cloth hard, it becomes much denser.
[...] There are other types of loom built in other cities, in other words Istanbul or in the Cilician region. The beater strikes the cloth without the help of the weaver, because this kind of beater doesn’t have a roller (pergel) like ours with arms; theirs is without them, only hanging from the ceiling and very close to the cloth beam. The weaver always has to push the beater back with both thumbs then let it go, allowing it to slide forward and squeeze the fabric. This system is noisless, is neat and good and the result is much better that the first, because the cloth is finer. [page 59]
Weaving with a loom
The heddle is made up of four threads twisted together becoming almost like a violin string. After being twisted it is made into skeins. The skeins are then submerged in a reasonably thick solution of asphodeline and and water, then squeezed well, removed and wound on a skeiner. Pre-determined lengths are then cut while wet and wound and tied round thin reed spindles set in the ground in the sun and left to dry. The resulting correct looped and treated threads (now heddles) make up the heddle assembly.
The heddle too has its tool to hold the harness (group of heddle bars and heddles) in place and to tension it.
[The description of this tool and ‘weaving’ given in Armenian here cannot, because of the language used, be translated successfully].
There are six heddle bars, of which three are linked to the treadle for the right foot and the other three for the left. Of each of these two sets, two of the bars are at the top of the heddles, above the warp, the third being below them. Their length is the same as the width of the cloth being woven; thus if the width of the cloth is 7 chlas (each chla consists of 40 threads) or eight, nine or up to 12 chlas, then each heddle bar has to be the appropriate length. The weaver must prepare the heddles (the heddle bar and the heddles – azp) in advance, so as to have them ready for use as necessary. Each warp thread has to be threaded through a heddle (azp) that has been fitted to the heddle bar in order [according the pattern to be woven]. Then pairs of the warp threads are threaded through the space between each pair of teeth in the comb fitted to the beater (dfa). The comb too is made according to the number of threads in the cloth to be woven.
Each of the two heddle bars located below the warp (one for each pair above it) has all the heddles for that pair looped on to it, to take the alternate chlas (each of 40 warp threads) that run through them. The upper bars have the heddles of 20 threads of each ball of thread (chla) looped alternately on each of them. This allows fewer heddles on each heddle bar and makes the cloth easier to weave. Each heddle has a place located 2 chlas towards the centre from each end, irrespective of the width of the cloth being woven. [page 61] Those on the upper heddle bars are used to attach loops of rope, each taking one of the ropes suspended from the pulleys fixed to the ceiling, and the lower ones are attached to the ropes from the treadles in the pit. When the weaver depresses one of the pedals, the warp threads running through the heddles attached to it are lowered and the other set, attached to the other pedal, rises, separating the sets of warp threads. This allows a space (called a shed) to be opened for the shuttle in front of the beater. At the same time the weaver uses both hands to pass the shuttle through the shed as quickly as possible, depending on his skill.
All the parts of the loom have been measured and fitted within the mill in their correct places. This leaves only two items – the shuttle and the stretcher. It is worth explaining them. The shuttle is generally made from the horn of a buffalo. Both ends are flat, sharp and polished and about 1cm [about half an inch] wide. They are fitted with a piece of metal about 1cm [half an inch] wide. The shuttle is about 20 cm [8 inches] long and has a slot in the middle. The slot has a small hole bored in each end, directly opposite each other, taking the reed used to carry the thread. There is another hole in the right-hand end of the slot to feed the weft thread to the centre of the shuttle. The spindle carrying the weft thread, slightly shorter than the reed, is fitted to it. This is the shuttle.
The stretcher also has an important role to play. It is fitted across the woven cloth immediately in front of the beater as it strikes it, and about 2 cm [just under an inch] from the woven edge. Three needles are fitted to each outer end which are pushed into the edges of the cloth across the width.
This tool, stretching the width of the cloth, makes the beater’s movement very easy. As soon as a hand’s-width of cloth is woven, the stretcher is moved towards the beater. It is a thin wooden assembly about two fingers wide and made of two parts. Each part is about 40 cm [16 inches] long. These two parts are fixed together with a swivel. When they are set straight, their total length is greater than the width of the cloth being woven. When the needles are pushed into the edges of the cloth therefore, the stretcher forms an angle, with the point of the angle at the centre. The tension on the cloth is maintained by using a metal rod that is fitted to the appropriate distance hole in each part of the stretcher, keeping its final length constant. There are several of these holes in each part, and are used to determine the tension required in the cloth.
The description of the prepared threads (henk)
[…] The weaver, according to the weight of the spun threads, prepares a solution of Asphodeline Laburnum (King’s Spear or Jacob’s Rod). To do this the weaver gradually adds the powdered Asphodeline to a bucket of water with his right hand, while stirring it with his left, until it becomes a sticky mass. He then transfers the solution to a deep, circular tray. He then undoes the prepared skeins of thread and adds them, one by one, to the liquid. He loops the skeins on his forearms and, stretching them tight, stirs them quickly in the liquid, so that not a single thread is left untreated. He continued like this until the whole quantity is done. This is called the ‘preparation for weaving’. Then the weaver – or someone else, generally a woman – takes these skeins and puts them one by one on the skeiner (nazug) to spin them onto spindles (masura) using the spinning wheel. One spindle holds a complete skein. After this work is completed, early in the morning, provided that there is no rain or snow, the weaver, shouldering a bundle of 70 to 80 smooth stakes of about 1 metre [39 inches] long, takes them to the field or a similar level place. He drives them [in a line, like fence posts] into the ground so that he can weave the [spindles of] thread on to them to dry [as described below].
The weaver, having determined the thickness or thinness of the thread, knows how many measures (gankun) [about 1.36 metres or 4 feet 6 inches] length he will need to allocate. He then lines up his stakes according to the total length and pushes the ends into the ground. If the thread to be dried is thin and the weight of the skein is six okhas [7.68 kg or 17 lb] in weight, then he measures out 30 gankuns [40.8 metrees or 135 feet] or 60 arshins [3] from the point he started at. Because there are two parallel lines of stakes, the length of cloth to be woven is 120 arshins [81.6 metres or 270 feet], in other words six tops (packages). At the start point, at the right, four stakes are driven into the ground. They are in a line and close together, in other words 5 cm [2 inches] apart and the same height. At the left hand end two stakes are driven into the ground. The distance between the two lines of stakes is about half a metre [20 inches]. From the four stakes the weaver begins to measure three and a quarter gankouns [4.42 metres, 14 feet 6 inches]; this distance is known as a godjag. Having measured the correct distance, he drives two stakes into the ground, and two more opposite them to mark the end of the parallel line. Their heights must be the same. He continues in the same way, driving pairs of stakes opposite each other for the full 30 gankun distance, where he only drives in one stake. He finall drives a thicker, longer stake [at an angle] into the ground 15 cm [6 inches] deep and within the line of stakes to act as a support for the first stake of each line. He does this to prevent it from bending under the gradually increasing twists of thread added to it. The weaver begins weaving the threads on to the stakes from the right-hand end. He continues this until he reaches the big supported end stake and, going round it, weaves the thread on the left-hand stakes. Then, continuing, he reaches the end – the place where the two stakes are opposite the original four - and, winding the thread on them, returns, [carrying out the same actions] until he as woven all required number of chlas (spindles of thread required). I didn’t say how he wove the threads on to the stakes. This is done using a tool known as a dasdadjagh.

The dasdadjagh
The dasdadjagh is made up of several parts. The base is quadrilateral in shape, with the parallel sides at the front and back. It is made of lengths of wood 2 cm [approx 1 inch] wide and thick. The dasdadjagh is 35 cm [14 inches] wide at the back, and the front (known as the ‘head’) is 20 cm [8 inches] wide. The two remaining sides of the base are made of strips of wood the same width and thickness [page 64], but approximately 1 metre [39 inches] long. Each corner of the wide end has a post fitted about 30 cm [12 inches] high and 8 cm [3.5 inches] circumference. The top ends are joined by a piece of wood about 35 cm [14 inches] wide and 2cm thick. The posts have 10 holes bored in each set 2 cm [approx 1 inch] apart, facing each other, each pair carrying a horizontal rod with two holes bored through it near the ends, but within the framework. Each hole is to take the thread from one spindle.
The front-to back base members have 10 holes bored in each about 10cm [4 inches] apart to take the spindles carrying a thread each. The threads are fed through the holes in turn, the nearest on on the right (for example) through the hole in the lowest rod on that side, and so on, until all 20 threads have been threaded through the correct holes.
An upright is fixed to the outer side of each long base member about 30cm [12 inches] from the narrow end of the assembly and a crossmember nailed to join them together at the top. A further piece of wood 10cm [4 inches] circumference joins the top of the wide end to the top of this sub-assembly as a carrying handle. This therefore is the dasdadjagh. The person creating the 40 thread skein (henk) begins: he holds this tool in his right hand and ties the first 10 threads to the first of the four posts set close together; the second 10 threads to the second alternately and so on, always turning the tool left or right. [page 65]
This tool made to assist in the creation of a skein of 40 threads (henk) should not be considered to be a primitive implement. On the contrary, the weaver or carpenter who built it has known and given it considerable delicacy and lightness. All its parts are carefully calculated to suit, so it is good and tidy and is easy to use.
I clearly stated before that from the four stakes the weaver has measured three and a quarter gankouns [4.42 metres, 14 feet 6 inches]; this distance is known as a godjag. This distance is the same as that from the place the weaver sits in the pit to the roller fixed to the ceiling above his head. In other words it is equal to the distance from over that roller to the the one fixed to the floor, then under it as far as the cloth beam three and a quarter gankuns, or approximately seven arshins [4.42 metres, 14 feet 6 inches]. Three times this length, in other words three godjags is about 20 arshins or 1 top (package). There are weavers who can work three godjags a day, in other words one top of cloth. There are others that are more experienced and faster and can work one and a half tops. But the latter will not have the durability of the former, bearing in mind that it is not as closely woven. Each godjag of a henk uses four spindles of spun thread that are spun onto them using the spinning wheel.
The skeiner has four arms that are two fingers [4 cm, 1.5 inches] wide and 40 cm [16 inches] long, set onto the ends of two wooden cross pieces, one at the top, the other at the bottom. The bottom cross piece is larger than the top one. The two cross pieces are set on a slim spindle set firmly on a stone, running through a central hole in each. This allows the skeiner to turn without hindrance left or right. The skein is put on the skeiner and the thread is then spun onto spindles.
The way to whiten (khasar) the cloth, or to may-time (mayis) it
The weaving of cloth has to be completed by the middle of May or, at the very latest, at the end of that month. The cloth has to be whitened (khasar) and it can be best done then. The village woman knows this very well through her traditional experience, not because it is impossible to do this work in other months, [page 66] but because the materials for whitening cloth are not available during them. For in the local dialect of the people of Palu the word mayis not only means May (the month) but also animal dung. And mayisel (may-time) means to whiten cloth with dung; secondly to defecate; [...] thirdly to become soiled with excretia.
How do Armenian women whiten cloth? They fill large cauldrons more than half full of water, add a considerable amount of thinned animal dung produced during the month [...] and stir the mixture with long ladles. Then they add the cloth to the mixture bit by bit, squeeze it well down into the liquid and rumple and crease it. They continue to do this until the cloth has absorbed the slippery mixture. They leave it for two or three days, then take the treated cloth to the spring or the baks of a stream to wash it. There, the Armenian women and girls throw each length of cloth into the water, then wash and squeeze the water out of it. They then spread it out (meynen) on a level place and leave it to dry under the sun. This washing, squeezing and drying is repeated several times, until the desired whiteness is achieved. They then take it home.
It is a moot point as to why the dung produced by grazing animals during the other months is not used for fulling, and only that produced during May is [page 67].
Rev Harutiun Sarkisian (Alevor)
- [1] In creating this glossary we have made use of S. Malkhasiantz’s Armenian Explanatory dictionary, which is very rich in explanations of words to do with weaving. We have also used the rich dictionary of dialect words added by Rev Harutiun Sarkisian at the end of his book.
- [2] A note concerning this translation: It proved impossible to keep to Sarkisian’s text which written as a rough guide by someone who knew how to build a loom but did not describe its assembly and parts adequately for it to be grasped by a layman without difficulty. In fact there is one paragraph in it which defied translation, as will be seen. I found that it was necessary to add phrases and sentences to amplify or adequately describe its construction and fine tuning. I have used the correct technical terms and clarified the functions and descriptions to accord with current pit loom terminology usage. I trust the reader will forgive the liberties taken with the original text (Ara Stepan Melkonian, the traslator).
- [3] One arshin is equivalent to 68 cm (28 inches) or half a gankun. The arshin is a Turkish measure of length no longer in use.